
Do you have outworn grout on your home that needs changing? You want to do it yourself and not pay a contractor to do it, but you don't know how? Don't worry, you came to the right article. Here we are going to lay out all you need to know to be able to do this yourself with pro-level results.
Many people may see this task as a challenge and beyond their DIY skills. However, with some confidence, a little patience and some help from this article. As we have laid out here, you will be able to grout any of your tiles correctly. More importantly, you will have amazing results that you can be proud of.
However, before you break out your tools, you need to be prepared and completely understand the whole process. This is because a poorly done job would not only look bad but also be less stable and more likely to chip or need repairs. Therefore, in this article, there is all you need to make sure that you have that perfect job and finish.
Why grout tiles?
We need to grout the tiles to make sure there is durability, hygiene, and a finished appearance in the tile installations. Firstly, it fills gaps between tiles, which prevents debris, moisture, and bacteria from settling in joints. It also reinforces stability by securing tiles in alignment, protecting edges from chipping, and creating a cohesive surface that withstands daily wear. Without it, tiles remain vulnerable to damage and uneven stress, shortening their lifespan.
Beyond structural benefits, it enhances hygiene and aesthetics. It seals joints to block water seepage, preventing mould growth and subsurface damage critical in wet areas like the bathroom tiles. It also gives a clean look, making the tile patterns or colours stand out more. The modern kind comes in a variety of shades to match or contrast the tiles themselves.
Tips on choosing the grout
With so many choices available, it can be hard to choose. Understandably, you might have some confusion about finding the best type of it to use for your particular project. Choosing the right grout all depends on the tile type you are using and the room you are putting it in. For most indoor applications, cement-based is cost-effective and comes in sanded or unsanded.
Meanwhile, in wet areas like showers, opt for epoxy as it is waterproof, stain-resistant, and ideal for high moisture zones. Consider colour in lighter shades that show stains, while darker tones hide dirt but may fade. For heated floors or exterior tiles, use flexible polymer-modified to withstand temperature shifts. These choices will impact the maintenance and aesthetics of the final result.
Where should grout be used?
This all depends on the position of the grout going to be placed. Internally tiled walls require a minimum joint width of 1 mm (movement dependent), and internally tiled floors need at least 2 mm joints to accommodate movement. On the other hand, ready-mixed is unsuitable for floors. External tiled surfaces (walls and floors) should use a cold-resistant cementitious material. It must be applied with a minimum 1 mm joint width.
Meanwhile, hygienic facilities require epoxy, and swimming pools with joint widths up to 3 mm should use frost-resistant cementitious. On the contrary, the ready-mixed products are unsuitable for pools or outdoor areas. Floors with underfloor heating need a minimum 3 mm joint width and a flexible type. You must ensure that wet rooms and shower walls have at least 2 mm joints (movement dependent). They should not use non-flexible or ready-mixed grouts with power showers.
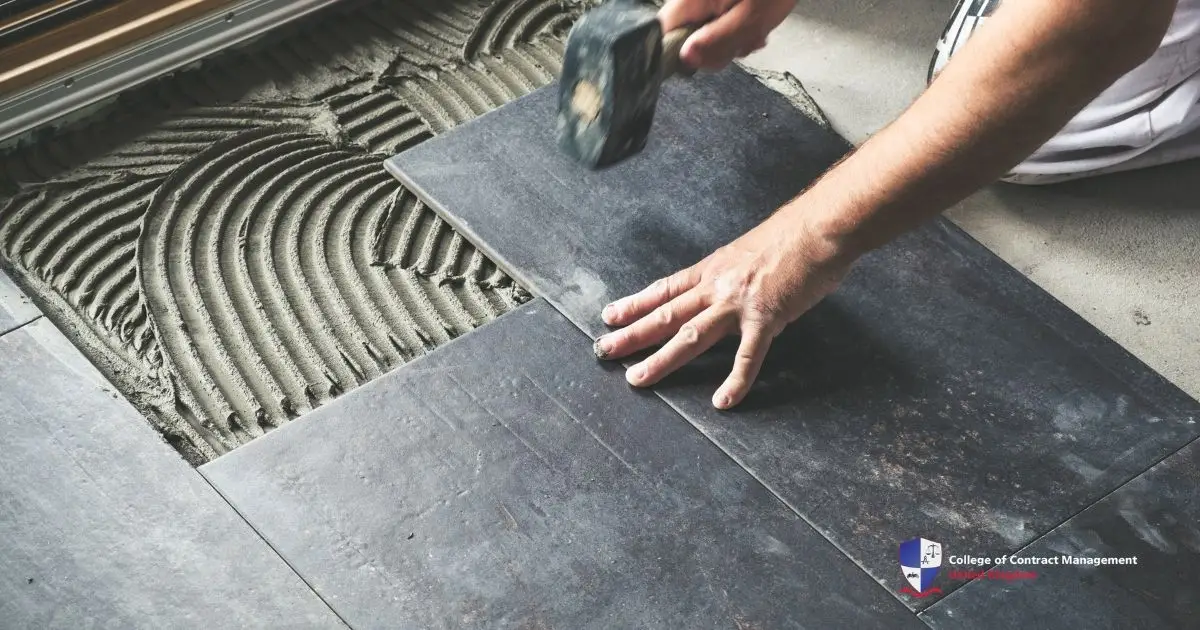
Installing grout on your tiles
Before starting the process, there are some considerations for you to understand to ensure you get the best results. Firstly, ensure that you get all the tools that are listed here. This will help you to complete the job without needing to stress about the tools. Secondly, do not put it in the perimeter joint of the floor or the internal joints of the walls. You will mix a sealant and grout to give a clean seal.
When grouting tiles, you should make the same considerations when choosing your grout as you do when choosing your adhesive. For example, if grouting a floating floor, you will need to consider the need for extra flexibility to cope with the additional movement in the floor. After considering all of these, these are all the tools you need to do this project:
- Suitable grout, see manufacturer’s guidelines.
- Mixing paddle
- Clean mixing bucket
- Suitable grouting float
- Bucket trowel
- Grouting sponge
- Personal Protective Equipment (PPE)
- Suitable Tile Polishing Cloth
- Wash Kit (including clean-up pads)
- Porcelain (or Stone) Cement Residue Remover
Preparing your tiles before grouting
Before grouting, check for any potential staining risk, and apply it to a leftover tile or offcut. If discolouration occurs or difficulties are encountered with cleaning off any surplus, you can use a sealer and repeat the trial. After that, make sure that all your lines are clean and free from debris and dust. Don't forget, as well, to check if there is any excess adhesive residue. For this case, you can remove it with a damp sponge. Most importantly, ensure the adhesive is completely dry before grouting (check the adhesive packaging for drying times).
After all of that, you either lift out or push the tile spacers into the adhesive so they won't obstruct any joints. Lastly, have a bucket of cold, clean water ready. If the temperature is above 25°C, dampen the joints with clean water first. It’s not advised to do it in temperatures below 5°C or in damp conditions. Tiling in hot and humid weather will dramatically alter the setting times, so always mix up small quantities of it and clean off a little at a time in warmer conditions.
Grout application
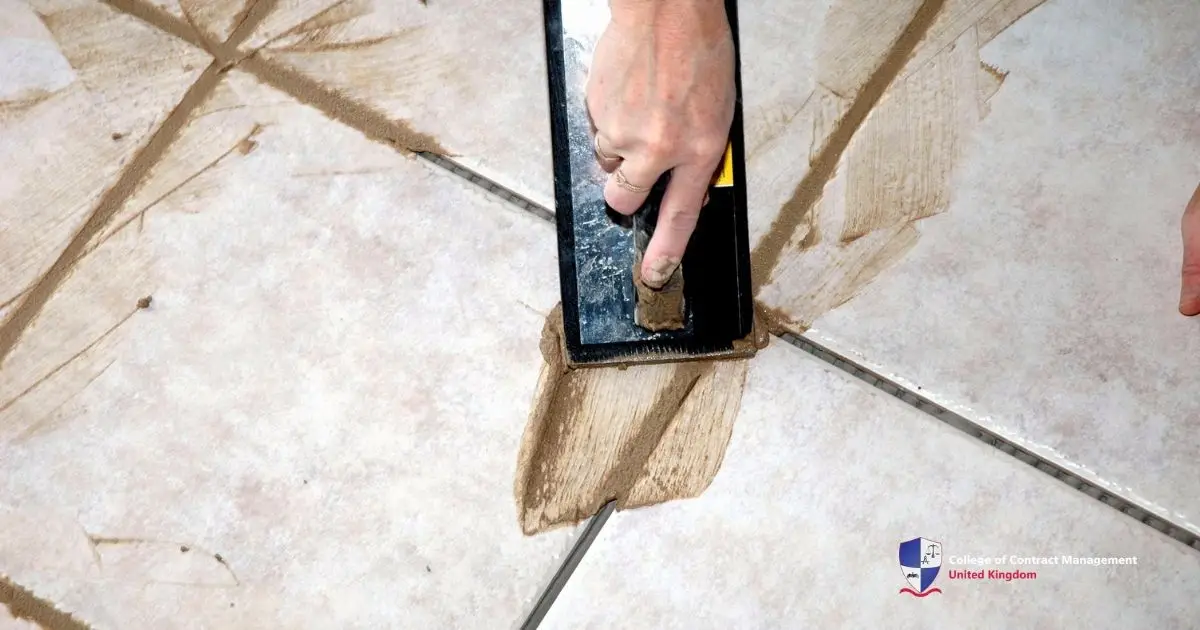
Finally, we are applying the grout. You need to start by mixing water and the powder in a mixing bucket as instructed on the packaging. Different grouts require differing quantities of water, also bearing in mind not to mix too much, as it will harden quickly. Place some of the product on the tiles, then hold the float at a 45° angle and apply it, ensuring all the joints are filled.
Once all the joints between the tiles are grouted, allow approximately 15 minutes for it to dry (at 20°C). Using a dampened sponge, clean the surface diagonally to the lines. Rinse out the sponge frequently with clean water. Do not apply too much pressure on the joints and don’t overwash them. If you do, it will remove the pigment from the surface of it, and white patches will appear in the end product.
If you have over-washed, this can be easily solved by gently sanding off the top layer with fine sandpaper. Allow around 60 minutes for it to set sufficiently within the joints. After that, polish the tile surface with a dry, clean cloth. As stated in the instructions, if completing a shower, do not use the shower for at least two weeks to allow it to fully cure.
Conclusion
By following these careful steps, starting from selecting the right grout to choose and preparing your tiles, you can achieve professional, long-lasting results. Proper width management, temperature control and post-application care ensure a long-lasting, clean and aesthetic appeal. With the right tools and patience, DIY installation becomes an empowering project, giving your surfaces a polished, beautiful finish you will proudly showcase.
If you want to know how construction materials impact the building, enrolling at the College of Contract Management is great! The college offers in-depth knowledge to help you understand the best practices in building projects. Whether you're looking to start a career in construction or enhance your existing knowledge, the college provides the perfect foundation for your success.